Thursday, March 24, 2005

Play Day

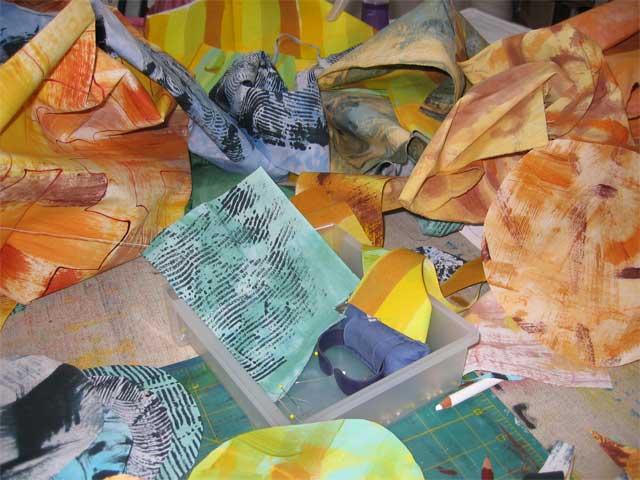
Today I met with 3 friends for a play day. We brought paints, stamps, thermofax screens, and other odds and ends to experiment with. I took pictures of us working but they're all blurry so I'm not posting them. Martha and Floris had some thermofax screens they wanted to work with. Getting the hang of screenprinting takes a little practice. The paint has to be the right consistency and you have to be careful that when pulling the paint you don't smear it or move the screen. Floris' screens were very cool - she had taken pictures of things like leaves and rocks and simplified them to line patterns. The effects were really wonderful. Dale was visiting from out of town and so she borrowed fabric and supplies from the rest of us. She really liked the curved tip syringe because you can draw very thin lines on the fabric.

These are the fabrics that I did:


This is a stamp made from a styrofoam meat tray that had a grid pattern on it. The paint is a metallic but I think all the shiny bits came off in the first roll.


This is a monoprint. The original fabric was lavender. I spread dark blue paint on an acrylic sheet, pulled one of those design thingies for doing wood grains through it and then laid the fabric down and pressed it into the paint.


These are squiggles made with a curved tip syringe.


A sponge print with several different colors, and a spiral stamp.


And this is the stamp I carved.

Monday, March 21, 2005

The first weekend of spring

I spent the weekend at a quilt retreat near Annapolis, Maryland with about 20 members of my local guild. We have a retreat center with a very large workroom, a second room with couches and a fire place, and sleeping rooms. Meals are served and we don't have to clean up. It's not real elegant but it's a great time for just stitching all weekend long. The only problem is trying to decide what to take. This time I made a baby quilt from start to finish. It's been hanging over my head for a long time (the baby will be a year old soon). I did something totally out of character - a pastel and white traditional log cabin quilt. I had to dig deep into my stash to find pastels! It was great to get it completed by Saturday afternoon and still have the rest of the evening and Sunday morning to work on an art piece. So here is a picture of the baby quilt. It's about 38" x 38"; the strips in the log cabins are 1" wide. To quilt the feathers I marked the spine and sort of sketched a few of the loops. After a few I decided I only needed to mark the spine - once you get into the rhythm of the loops it's pretty easy.


The great thing about these retreats is the sharing of ideas and techniques. One woman was making little paper quilts, another made a chenille top, another was making boxes with Timtex, another was making a carryall bag, lots of people were knitting. And of course there was lots of chocolate. In two weeks I'm going again with another group, this time all art quilters. Won't be working on anything traditional then.

Thursday, March 17, 2005

Close up of satin stitch binding


Ask and you shall receive - here's a close up of the satin stitch binding.

Exciting news - I'm going to France and Belgium for 2 weeks in April! My friend was selected to participate in an artist exchange with her town's sister city in France and since her husband can't go with her, she has invited me. Ten days in and around Paris, then 4 days in Belium visiting another friend, Linda.

Wednesday, March 16, 2005


The Ides of March

It's finished, signed, and photographed. The edges are done with a satin stitch with a thread that matches, sort of, the color of the block it's on. I left the grid sticking out, made it harder to do the satin stitch, but I like the uneven edge. The size is 45" wide by 24" long.


And here is a detail shot. You can see the quilting really well here. Next task is to add this to my web page.

Sunday, March 13, 2005

Quilting


Here is the quilting. The background is a simple grid. The circles are bobbin stitched with a pearl cotton size 12 thread. The blue (above) is some that I dyed myself. The gold (below) was purchased from Valdani threads.


On the circles I've added some extra fabric pieces to make them do a little spiraling. To finish the edges I will probably just do a zig zag all around the outside. I want to leave the red background strips sticking out beyond the edge, as long as they don't sag.

Also, I've uploaded a picture of me. Believe it or not, it's a passport picture. Better than the previous ones, for sure.

Monday, March 07, 2005

How'd that red get in there?


Back to circles

Back to the original circles, but rather than doing a symmetrical nine patch, I thought to make an 8 x 2 grid. And added red stripping to fill in the negative space. I like this for right now, so it's time to let it simmer for a while. I'll come back to it a in a little bit and see if I still like it and what it still needs.

Saturday, March 05, 2005

Working the circles


This is the first iteration. Quartered the blocks and just set them as nine circles. This is pretty static.


Now I've mixed the blocks up a little by turning some so the circles are less like circles. This is more interesting.


A little more moving around, and a block substitute down in the lower left hand - took out a quarter circle and put in a whole circle. This has to sit and percolate for a while so I'm leaving it.

These colors are weird for me, much more blue and green than I usually use. And so far there's no red or orange. But that may change.

Friday, March 04, 2005

Layered Circles - the first step


Posted by Hello

Starting out with circles

For the past few days I have been in a stuttering mode - cut fabric, put it up on the design wall, look at it, take it down. Nothing seemed to have any cohesiveness, it was just pieces of fabric. This is some of the fabric I painted in the past few weeks. So anyhow, I've gone back to my old standby - layered circles within squares. So far I've done the first step - sewing the circles down onto square (more or less) pieces of fabric. The next step will be to cut up the squares into quarters and mix them up. I may end up making more circle blocks because I might not have enough to get the effect I want (which I don't know yet what it is.)

The mess on the work table

Posted by Hello
This is what my work area looks like at the moment. I've cut circles and squares out of pieces and have just thrown the rest into a pile. I'll sort it out before going on to the next step. Have you ever heard of the "2 square feet" theory? No matter how large your table/work space is, you will only have 2 square feet available in which to work because the rest will be filled up with stuff.

I've been doing these layered circles cut into quarters for years, since at least 1999. My HIVE section was entirely these blocks. Sixty four 12" square blocks, I think I overdosed on the circles and didn't make them again for a long while. But now I've come back full circle (ha ha).